What is SSL and HTTPS
SSL stands for secure socket layer, which creates an encrypted link in between your web server and browser. Web browsers use HTTP (Hypertext transfer protocol) to access websites, which is not secure. ‘S’ stands for Secure to protect your unsecure connection.
Why to Use https Instead of http
Everyday we share our personal information like login details, debit or credit card details over the Internet. In order to protect our personal data, we need a secure connection. SSL protects your data from unethical users; that’s why top performing sites and eCommerce sites use https to secure the transition details of the users.
- Create WordPress Website for Free with Unlimited Hosting
- Complete Guide to Create Free Blog on Blogspot
Https also creates a good impact on your WordPress site. If your site has a secure connection, then Google takes it more important than non secure sites.
Enable https on WordPress with Cloudflare
Many WordPress sites are not using SSL because it’s not that cheap that many can afford on per year basis. However, Cloudflare is a popular CDN(Content Delivery Network) that provides free SSL, but many of us don’t know how to enable on our WordPress site.
To enable SSL and HTTPS, you need to be running a self-hosted WordPress site and have a Cloudflare account. Https is not enabled on WhatTechSays, but we have another blog, which is running on cloudflare flexible SSL. Let’s know how to enable it on your site.
1) Login to your Cloudflare account and add your website URL.

2) Then it’ll analyze your website DNS records. After complete, click on “Continue Setup”.

3) Now scroll down the page and click on “I’ve added all missing records, Continue”.
4) Choose Free plan and click on Continue button.

5) Update your domain Nameservers as shown in the page and click on “I’ve updates my nameservers, continue” button.

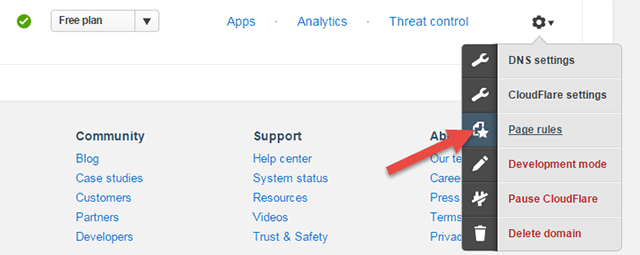
6) Select “Page rules” from the dropdown setting.
7) Add your website URL on the field, turn on “Always use https” and click on “Add rule” button.

8) Now go to your WordPress admin area and install Cloudflare Flexible SSL and WordPress HTTPS (SSL) plugin.

9) Now wait for 2-24 hours to enable it on your site.
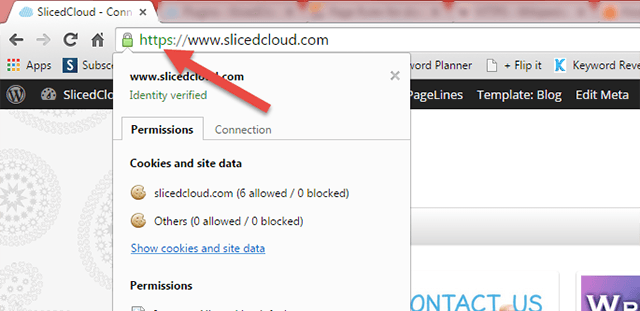
After enable SSL and HTTPS on your WordPress site, it increases your security and also security. Cloudflare’s flexible SSL made it easy for every user. If you are facing any problem regarding this, then feel free to comment below.