I think, most of you know about the data theft by Facebook. People don’t read the terms and conditions while giving their data to an Internet company. That’s why Cloudflare’s new 1.1.1.1 DNS is here.
On April Fool’s day, the popular Content Delivery Network (CDN) provider share some news about it’s new four 1’s DNS service to increase Internet speed in Windows 10.
Most of the people thought that this is an April Fool’s joke. But, it’s real. It is the Internet’s fastest, privacy-first consumer DNS service.
What is DNS and How does it Work?
DNS stands for Domain Name System (or Service or Server). It’s something like a master phone directory. You can’t remember everyone’s phone number, but you can remember many names.
That’s why we use the phone number directory to reach out the number of that person.
DNS also works like that.
It converts the matched memorable name to digits. Whenever you enter a website’s address on your browser, you send some data to the DNS provider to search for the actual IP address of that domain you are trying to connect.
Once the DNS gets that IP address, it makes a connection with your browser. This’s how a website or web address works.
The average DND lookup takes 32 milliseconds. That’s you face slow Internet browsing on your computer. If your DNS lookup is less than the average speed, you get faster Internet performance.
What is Cloudflare’s 1.1.1.1 DNS and How does it Work?
The 1.1.1.1 is nothing but a free Domain Name Service provided by the CloudFlare company. Every Internet Service Provider has DNS to look up the web address you enter in your browser.
You can use 1.1.1.1 on your router, computer, smartphone, etc. All you need to do is, just change the setting and allow your operating system to go through the new CloudFlare’s DNS.
Why Should You Need 1.1.1.1 DNS?
There have been fast DNS services for years to increase Internet Speed. The most popular Cisco’s OpenDNS and Google’s Public DNS is head in this line. If you are already enjoying this service for free, then why should you need Cloudflare’s 1.1.1.1 DNS?
The answer is, there’s a small problem with all of the other DNSs is the privacy. By default, a DNS server always records the addresses you entered to access a website. That means, these public DNS know everything about your browser history. In this way, they sale advertisements with you.
But, the case is totally different with 1.1.1.1. The company promised that, they will not collect user browsing data itself and that promise is being verified by KPMG. In that way, by using this DNS you’ll get faster Internet speed and you don’t need to worry about your privacy.
How to Use Cloudflare’s 1.1.1.1 DNS on Router
If multiple devices are connected with your home or office router, then you don’t need to switch to Cloudflare’s 1.1.1.1 DNS on every device. Just set it up on the router and you are ready to go.
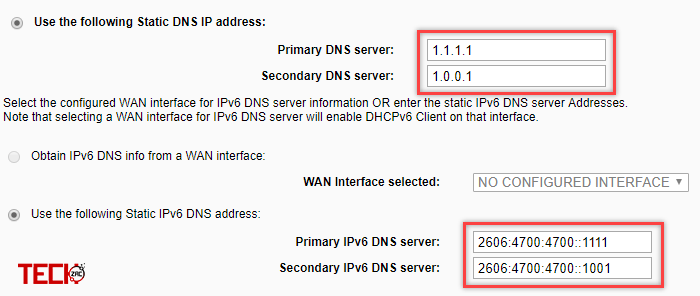
1. log in to your router and look for DNS server settings. In most cases, it is available in the Advanced settings. It may vary in different routers.
2. Now add or replace the existing DNS records with the below ones.
- IPv4: 1.1.1.1 and 1.0.0.1
- IPv6: 2606:4700:4700::1111 and 2606:4700:4700::1001
How to Use Cloudflare’s 1.1.1.1 DNS on Windows PC
Everything you need to do with your Windows computer is available on the Control Panel. But, finding the Control Panel is different in a different version of Windows OS. In Windows 10, you have to search it on the Start menu or type control on the Run command. In the older versions of Windows, it is present right on the Start Menu.
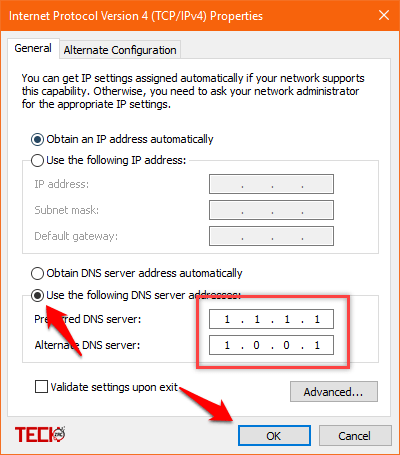
1. Open Control Panel → Network and Internet → View network status and tasks → Change Adapter settings.
2. Here, you’ll get a list of network connections. Either choose the connected Ethernet or Wi-Fi network which you want to switch to Cloudflare’s DNS.
3. Right-click on a network and select “Properties“.
4. In the Properties window, scroll down and select “Internet Protocol Version 4 (TCP/IPv4)“. Now click on “Properties“.
5. In the new window, select “Use the following DNS server addresses:” option and use 1.1.1.1 and 1.0.0.1 respectively. That’s it.
You can also do it with the Internet Protocol Version 6 (TCP/IPv6). Here you have to set the value as 2606:4700:4700::1111 and 2606:4700:4700::1001.
How to Use Cloudflare’s 1.1.1.1 DNS on macOS
It’s super easy to change or replace the default DNS with Cloudflare’s DNS on a Mac computer.
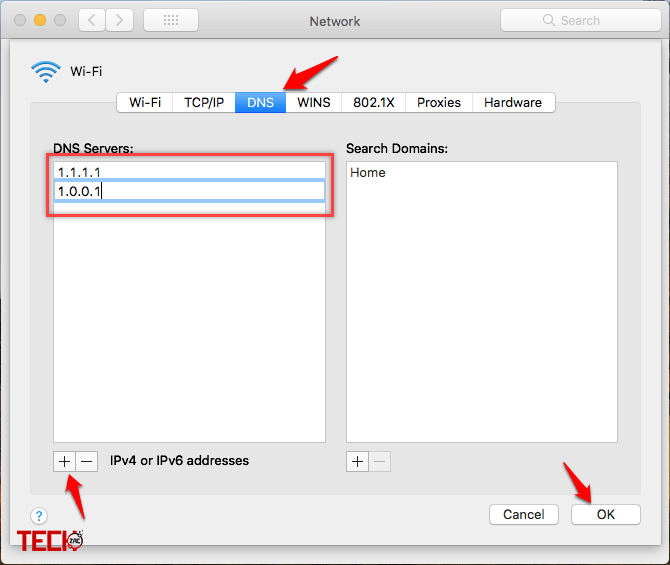
1. On your MacOS open System Preferences → Network.
2. In the list at the left, select the Wi-Fi or the Ethernet connection which you want to modify, and then click “Advanced“.
3. Click DNS, then click the “+” icon at the bottom of the DNS Servers list.
4. Enter 1.1.1.1 and 1.0.0.1 in the IP address section and click “Ok”.
That’s it. Now, your default DNS has been changed to Cloudflare’s 1.1.1.1 DNS on your macOS computer.
How to Use Cloudflare’s 1.1.1.1 DNS on Linux
By default, there is no way to change the DNS in a Linux system. But, you can do it with the Network Manager. Once you download it, click the IPv4 or IPv6 tab and then follow the below steps.
1. Set the “Automatic” toggle on the DNS entry to Off.
2. Put 1.1.1.1 and 1.0.0.1 in the DNS entries field. If you want to set it for the IPv6, then you can set it as well; the entries will be 2606:4700:4700::1111 and 2606:4700:4700::1001
3. After that, click on Apply and then restart your browser. That’s it.
How to Use Cloudflare’s 1.1.1.1 DNS on iOS
As like the macOS, it’s also very easy to play with the DNS settings in an iOS device.

1. On your iPhone or iPad, open Settings → Wi-Fi, and tap on the “i” icon next to your WiFi connection.
2. Scroll down and tap on “Configure DNS” option. You just need to change the Automatic mode to Manual in order to switch to Cloudflare’s 1.1.1.1 DNS.
3. After that, tap on “Add Server” and enter “1.1.1.1” and “1.0.0.1“.
4. If you have other DNS services, then delete them.
5. Once you have done, simply tap on the “Save” option in the top-right corner.
Now you are ready to browser the fastest Internet connection with protected privacy.
How to Use Cloudflare’s 1.1.1.1 DNS on Android
As like the Linux, it’s more complicated to set up DNS on Android than with other operating systems. To simplify the process, you need to download the DNS Changer from the Play Store.
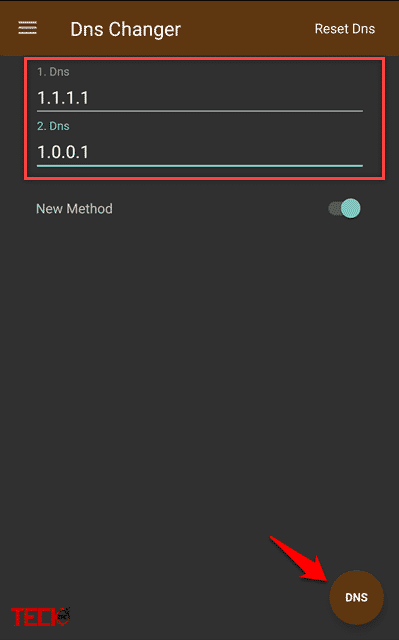
1. Open DNS Changer and enter “1.1.1.1” and “1.0.0.1” respectively in the first and second DNS section. Once done, tap on the “DNS” button in the bottom-right.
3. The app will ask you for a VPN connection request. Simply tap on the “OK” to continue.
That’s it. Cloudflare’s 1.1.1.1 DNS is now ready to use on your Android device.
My Experience with Cloudflare’s Privacy DNS 1.1.1.1
Cloudflare says in its blog posts that the 1.1.1.1 service is possibly faster than Google and OpenDNS. In my computer, I got an average of 19ms connection speed, which is faster than Google DNS. If privacy is your number one concern, then switch to Cloudflare’s 1.1.1.1 DNS right now on all of your devices. I’m sure, you’ll get a better browsing speed as well.
Don’t forget to share your experience of the new 1.1.1.1 DNS on your device. If you like this guide, then don’t forget to share with your friends.