How to Enable and Disable Hibernate in Windows 10
With the new Windows 10 Start Menu, you have a plenty of ways to customize it, which was not available in the earlier version of Windows. It is the most beautiful thing happened to the Microsoft history. You’ll see significant changes in terms of user interface, speed, security and much more. These things might be confused a new user, but it is very user-friendly.
Difference Between Sleep and Hibernate (Windows 10)
Windows has many options available in terms power management though most of the people only use two options; Power on and Shutdown. Hibernate isn’t available for all computers. It was primarily designed for laptops and notebooks which may not always be connected to a power source.
- How to Increase Internet Speed in Windows 10
Sleep mode is useful when you want to stop working for a short period of time. It is similar like pausing a DVD movie. You can quickly resume your all works within seconds.
But, Hibernate mode saves your all working tasks and documents on your hard disk and shuts down the computer. That means it consumes very less power as equal to zero. Hibernate mode uses less power than sleep mode, but it takes a little bit more time to wake up. You can resume your all tasks where you left off. If you are not going to use your laptop for a long time period, then always use hibernate option to save your battery. Well, follow the below steps to enable or disable hibernate in Windows 10.
How to Enable Hibernate in Windows 10?

As I said before, Hibernate mode is not designed for all computers, especially the desktops. If you have a laptop or notebook, you can use this. Let’s know how to enable Hibernate mode in Windows 10.
1) Open the Start menu and click on Settings.
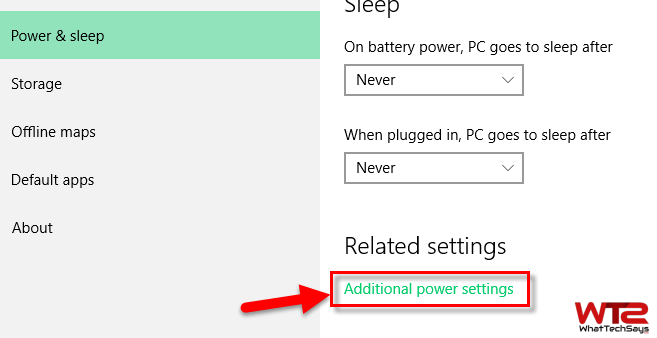
2) After that navigate to System >> Power & sleep. From here, click on “Additional power settings” from the bottom of the screen.

3) It’ll open the “Power Options” window. From here click on “Choose what the power button does” option from the left-side menu.

4) On the next screen, you’ll get few options with no accessibility. Click on ” Change settings that are currently unavailable” option to make all options accessible.

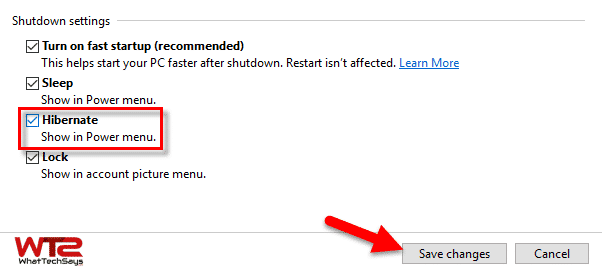
5) Finally, enable hibernate option and click on “Save changes” button.

After that, you’ll see a Hibernate option on the Power button. To disable this option, follow the above tutorial and uncheck the Hibernate option. In this way, you can easily enable and disable Hibernate in Windows 10. Hibernate can save your battery life for the future when you need it the most.