How to Downgrade iOS 10 Beta to iOS 9 without Losing Data
- Get Paid Apps for Free without Jailbreak on iPhone or iPad
- Enable Infinite Photo Zooming on iPhone or iPad
Some prerequisites are needed to perform this task. You need a USB cable for your iPhone or iPad to connect to the computer and the latest version of iTunes software installed in the Mac OS X or Window.
Downgrade iOS 10 Beta to iOS 9.3.2
Before going to the procedure, a couple of things you should consider. If you have a backup on iOS 10, you will not be able to restore without losing data to it on iOS 9. But if you have an iOS 9 backup, after downgrading you can restore back to it. Don’t forget to backup all of your data, such as photos, contacts, messages, etc. Let’s come to the procedure,

- First, you all need to download iOS 9.3.2 IPSW file for your iPhone, iPad or iPod touch on your computer. The device model must match the IPSW for the downgrade process, or else you will get an error in iTunes.
- Then, launch iTunes on your Mac or Windows computer and connect your iDevice to the computer with a USB cable.
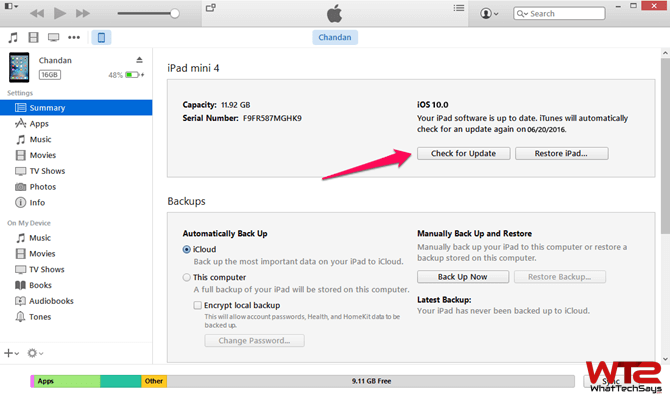
- After that, choose your device and go to the Summary page. Here you’ll get two options; Check for Update and Restore.
- On the Mac OS X, press OPTION + click the “Check for Update” or if you on the Windows, press SHIFT + click the “Check for Update” button.
- It’ll open a window to select the download IPSW on your computer. Just select it.
- It’ll pop up a confirmation window. You just need to select “Update” button to downgrade iOS 10 to iOS 9 without losing the data.
If you want a clean install of iOS 9.3.2 on your device, follow the same procedure and choose the “Restore” button rather than “Check for Update“. Once the downgrade has finished, you can restore from a backup created earlier.
This is the procedure on how to downgrade iOS 10 beta to iOS 9 without losing data. In some rare cases, this might not work, and you might get an error, but you know this works for me every single time. Try this today and don’t forget to share your experience.